How to Renew a Japan Work Visa — How to Fill the Application Form + Complete Guide (Excel/PDF Download)
Please support us by sharing!
If you are already working in Japan (or any country with a visa system), one thing you’ll definitely face is the need to renew your work visa. For many, especially the first or second time, the renewal process feels like a headache. This is why most people end up hiring a lawyer or agent to handle it for them.

But here’s the truth: if you’ve been following the rules paying taxes on time, working under the correct visa status, and having documents aligned with your job or studies: renewing your work visa is not as complicated as it seems. With the right preparation, proper documents, and a little research, you can absolutely do it by yourself without spending extra money on agencies.
In this guide, I’ll walk you through exactly how I renewed my work visa on my own. Everything I share here comes directly from my personal experience, step by step, so that anyone in the same situation can feel confident to handle the process themselves. By the end of this article, you’ll see that visa renewal is more about being organized than about legal complexity.
Disclaimer: This blog post is for educational and informational purposes only. It does not encourage or endorse illegal employment in Japan. Readers are advised to consult with legal professionals or immigration authorities before accepting any job offers.
When and Where to Renew Your Work Visa in Japan
In Japan, you can apply for a work visa renewal up to three months before your current visa expires. From my own experience, I strongly recommend not waiting until the last moment. Applying early at least 1 to 2 months before expiry gives you extra time in case immigration requests additional documents.
For the renewal process, the safest and most straightforward option is to go directly to the Immigration Services Agency (入国管理局 / Nyūkoku Kanrikyoku). When I did my first renewal, I wasn’t 100% confident whether I had prepared every document correctly. The staff at the immigration office checked my application on the spot, and when something small was missing, they clearly told me what I needed to bring back. That guidance gave me a lot of relief and saved me from unnecessary delays.

That’s why my suggestion is simple: If it’s your first or even second renewal, visit the immigration office in person. Not only will your documents be reviewed immediately, but you’ll also gain confidence about how the process works in Japan. After you’ve gone through it once or twice, you’ll feel much more comfortable handling renewals smoothly on your own.
Download Applications
Pick the format you prefer and print for submission:
- Excel (.xlsx): Type on your computer, save, then print.
- PDF (.pdf): Print first, then fill by hand (or use a PDF editor if you prefer typing).
Both files contain the same fields. After filling, sign where required and keep a copy for your records.
Required Documents for Work Visa Renewal in Japan
When renewing a work visa in Japan, preparing the correct set of documents is the most important step. From my own renewal experience, I learned that once you have everything ready in advance, the process becomes much smoother. Below is a breakdown of the documents you should prepare as an individual applicant, as well as the documents your employer will usually handle. I’ve also included some extra cases (like moving cities or changing jobs), so you can avoid last-minute issues.
1. Documents You Need to Prepare
- Passport & Residence Card (パスポート・在留カード) – Both must be valid and submitted together with your application.
- Application for Extension of Period of Stay (在留期間更新許可申請書) – This is the official Immigration Bureau form. We will provide a step-by-step guide on how to fill this form later in this blog.
- ID Photo (写真 縦4cm × 横3cm) – A recent, passport-size photo (taken within the last 3 months), with plain background and clear face visibility.
- Certificate of Employment / Job Contract (在職証明書・雇用契約書) – Issued by your employer to confirm your current job position, role, and employment status.
- Tax Certificates (税関係証明書) – These are very important for renewal and can be obtained directly from your local ward office (区役所) or city hall (市役所):
- 課税証明書 (Kazei Shōmeisho – Taxation Certificate) – Shows your total income and the amount of tax you were expected to pay.
- 納税証明書 (Nozei Shōmeisho – Tax Payment Certificate) – Confirms that you have actually paid your resident taxes properly.
- Residence Certificate (住民票 – Jūminhyō) – Not always required, but Immigration may request it, especially if you have dependents or moved recently. You can get this at your ward office or sometimes at convenience stores with a MyNumber card.
2. Documents Your Employer Provides
Immigration may also ask your company to submit financial and registration documents to confirm the stability of the organization employing you. From the sample I’ve seen, companies usually prepare:
- Withholding Tax Report (源泉徴収票等の法定調書合計表 – Gensen Chōshūhyō-tō no Hōtei Chōsho Gōkei-hyō) – This report shows the total income tax withheld from employees’ salaries. Immigration uses it to confirm that the company is properly paying and reporting employee taxes.
- Balance Sheet (貸借対照表 – Taishaku Taishōhyō) – A financial statement that lists the company’s assets, liabilities, and capital. It shows the company’s overall financial health and stability.
- Profit and Loss Statement (損益計算書 – Son’eki Keisansho) – A financial statement showing the company’s revenue, expenses, and net profit or loss. Immigration checks this to see if the company is financially capable of employing staff long-term.
- Statement of Selling & Administrative Expenses (販売費及び一般管理費内訳書 – Hanbai-hi oyobi Ippan Kanri-hi Uchiwake-sho) – A detailed breakdown of the company’s selling and administrative expenses. It helps prove that the company’s reported expenses are legitimate.
- Statement of Changes in Shareholders’ Equity (株主資本等変動計算書 – Kabunushi Shihon-tō Hendō Keisansho) – A financial document showing how the company’s shareholder equity has changed over the year (e.g., new investments, retained earnings). Immigration uses it to check financial transparency.
- Certified Copy of Company Registration (登記簿謄本 – Tōkibo Tōhon) – An official document issued by the Legal Affairs Bureau. It proves that the company is legally registered in Japan, and includes details like company name, address, representative director, and capital.
Not always. The exact documents required depend on your situation:
- Same employer, big/stable company: Usually just the Withholding Tax Report and Company Registration are enough.
- Changed jobs since last application: Immigration often requests the full set of company documents from your new employer.
- Smaller company or startup: Requirements vary. Sometimes Immigration only asks for the key documents, but they may request additional financial statements if needed.
You don’t need to prepare the company documents by yourself. These papers are normally handled by your employer (HR or administration). Based on your situation, you can simply request the necessary documents from your company, and they will prepare them for you. When you submit your application to Immigration, if any additional paperwork is required, the Immigration office will inform you, and you can then ask your employer to provide those extra documents.
About the Extra Reference Sheets in the Application Pack
When you download or receive the visa renewal application pack, you might notice some extra pages that look like guides or lists. For example, one page shows a table of “Purpose of residence” and which application form (J, K, O, U, etc.) to use. Another set of pages show the Business Type List (業種一覧) and Occupation List (職種一覧).
Which Pages to Actually Fill In
- Page 1: Applicant’s personal information
- Page 2: Employer / organization information & work history
- Page 3: Employer confirmation, contract, salary, and where the Business Type (業種) and Occupation (職種) codes are written
- Page 4: Dispatch information (if applicable) + employer’s signature, stamp, and date (always required even if dispatch does not apply)
The other “extra” pages (form type guide, business type list, occupation list) should not be counted as part of your filled application. In this blog, when I say Page 1, Page 2, Page 3, and Page 4, I am referring to the actual application sheets that need to be filled and submitted. The reference sheets are simply tools to help you or your employer select the right categories and codes.
How to Fill Out the Renewal Application Form
The official form for renewing your visa in Japan is called the 在留期間更新許可申請書 (Application for Extension of Period of Stay). It is issued by the Immigration Services Agency of Japan. The form has three main pages:
- Page 1: Personal Information
- Page 2: Employer Information & Job Details
- Page 3: Reason for Renewal / Signature (and for company/school use)
- Page 4: Dispatch information (if applicable) + employer’s signature, stamp, and date
Page 1: 個人情報 / Personal Information
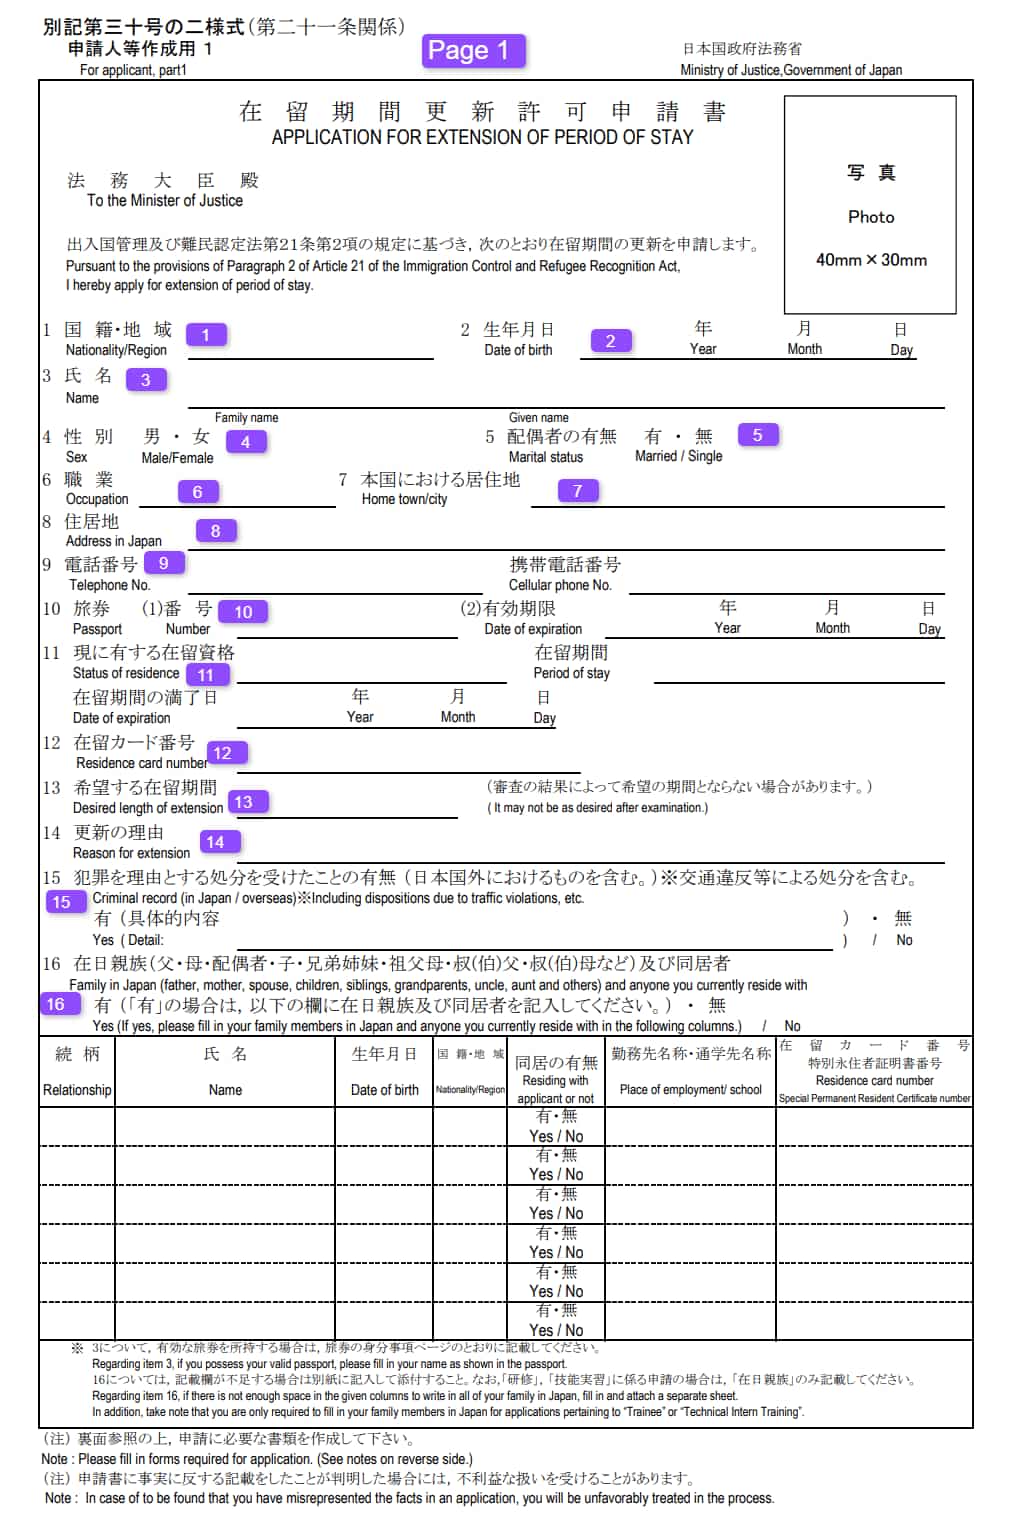
1. 国籍・地域 (Nationality / Region)
Here, write your nationality as it appears in your passport.
You can write it either in English or in Katakana.
Examples:
・If you are from Nepal → write “Nepal” or ネパール (in Katakana)
・If you are from India → write “India” or インド (in Katakana)
・If you are from the Philippines → write “Philippines” or フィリピン (in Katakana)
2. 生年月日 (Date of Birth: 年 / 月 / 日)
In this section write your Date of birth. Year, Month, Day (YYYY/MM/DD).
Example: 1995/07/15
3. 氏名 (Name: Family name / Given name)
Write your full name exactly as it appears on your passport.
First, write your family name (surname), then your given name.
Example: Smith John
4. 性別 (Sex: 男・女)
Select Male(男)or Female(女).
Example: Male
5. 配偶者の有無 (Marital Status)
Select whether you are Married(有)or Single(無).
Example: Single
6. 職業 (Occupation)
Write your current job title.
If you are a full-time employee, you can also write 「正社員」.
Example: Software Engineer / English Teacher / 正社員
7. 本国における居住地 (Home town / City)
Your permanent address in your home country.
Example: Kathmandu, Nepal
8. 住居地 (Address in Japan)
Write your full current address in Japan, including the postal code.
Example: 〒160-0022 Tokyo-to, Shinjuku-ku, ○○-1-2-3, Apt 101
9. 電話番号・携帯電話番号 (Telephone / Cellular Phone)
There are two fields here:
・電話番号 (Telephone No.) – If you have a home landline, you can write it here. Example: 03-1234-5678
・携帯電話番号 (Cellular Phone No.) – If you mainly use a mobile phone (which most people do), write your mobile number here.
Example: 090-1234-5678
10. 旅券 (Passport: 番号 / 有効期限)
There are two fields here:
・旅券番号 (Passport Number) – Write your passport number exactly as shown in your passport. Example: TR1234567
・有効期限日 (Date of Expiration) – Write the expiry date of your passport.
Example: 2028/04/15
11. 現に有する在留資格・在留期間 (Current Status of Residence / Period of Stay)
In this section, you must copy three pieces of information directly from your 在留カード (Residence Card):
-
Status of residence (在留資格): Write your current visa type.
On most residence cards, this is written in both English and Japanese.
Example: Engineer/Specialist in Humanities/International Services (技術・人文知識・国際業務) -
Period of stay (在留期間): Write the length of your visa (1 year, 3 years, 5 years, etc.).
Example: 1 year -
Date of expiration (在留期間の満了日): Write the exact expiry date of your visa in
Year / Month / Day (YYYY/MM/DD) format.
Example: 2025/09/30
12. 在留カード番号 (Residence Card Number)
The number on your residence card.
Example: AB12345678CD
13. 希望する在留期間 (Desired Length of Extension)
Here you can request how long you would like your new visa period to be.
The usual options are 1 year, 3 years, or 5 years, depending on your job and personal situation.
Example: 3 years
14. 更新の理由 (Reason for Extension)
Short and factual reason.
Example: “I will continue working full-time at ABC Co., Ltd. in the same position.”
15. 犯罪歴 (Criminal Record: 有 / 無)
In this section, you must declare whether you have a criminal record.
Select 有 (Yes) if you have any past convictions, and 無 (No) if you do not.
Example: 無 (No)
16. 在日親族及び同居者 (Family in Japan & Co-residents)
What this field is for: In this section, you must list two groups: family members who are in Japan (spouse, children, parents, siblings, etc.) and people who currently live with you, even if they are not family. If you do not have anyone to list, select “無 (No)”. If the space is not enough, you can attach a separate sheet in the same format.
Who to include:
- Family members in Japan, even if they live in another city.
- Co-residents at your address, such as roommates.
- Special case: If you are applying under “Trainee” or “Technical Intern Training,” only list family members in Japan.
How to fill each column:
- 続柄 / Relationship – Spouse, Child, Father, Mother, Roommate, etc.
- 氏名 / Name – Full name (same as in passport).
- 生年月日 / Date of birth – Format: YYYY/MM or YYYY/MM/DD.
- 国籍・地域 / Nationality-Region – Example: Japan, USA, Philippines.
- 同居の有無 / Residing with applicant – Mark Yes(有)or No(無).
- 勤務先名称・通学先名称 / Place of employment or school – Write company or school. For infants, write “N/A.”
- 在留カード番号 / Residence card number – Only if they have a Japanese residence card.
- 特別永住者証明書番号 / Special Permanent Resident Certificate number – Only if applicable; otherwise leave blank.

Examples & tips:
- If you have no family or co-residents in Japan, tick “無 (No)” and leave the table blank.
- Children and spouses living in Japan will have their own Residence Card numbers.
- Parents or relatives only have a Residence Card if they live in Japan with a valid visa status. If they are visiting short-term, leave it blank.
- If you run out of space, attach an extra page and note “See attached sheet.”
Page 2: 事業所・勤務先情報 / Employer & Job Details
Page 2 is all about your workplace and professional background. Immigration uses this page to confirm your employer’s details, your education and major, and your employment history. This helps show that your job duties in Japan are a good match for your visa category.
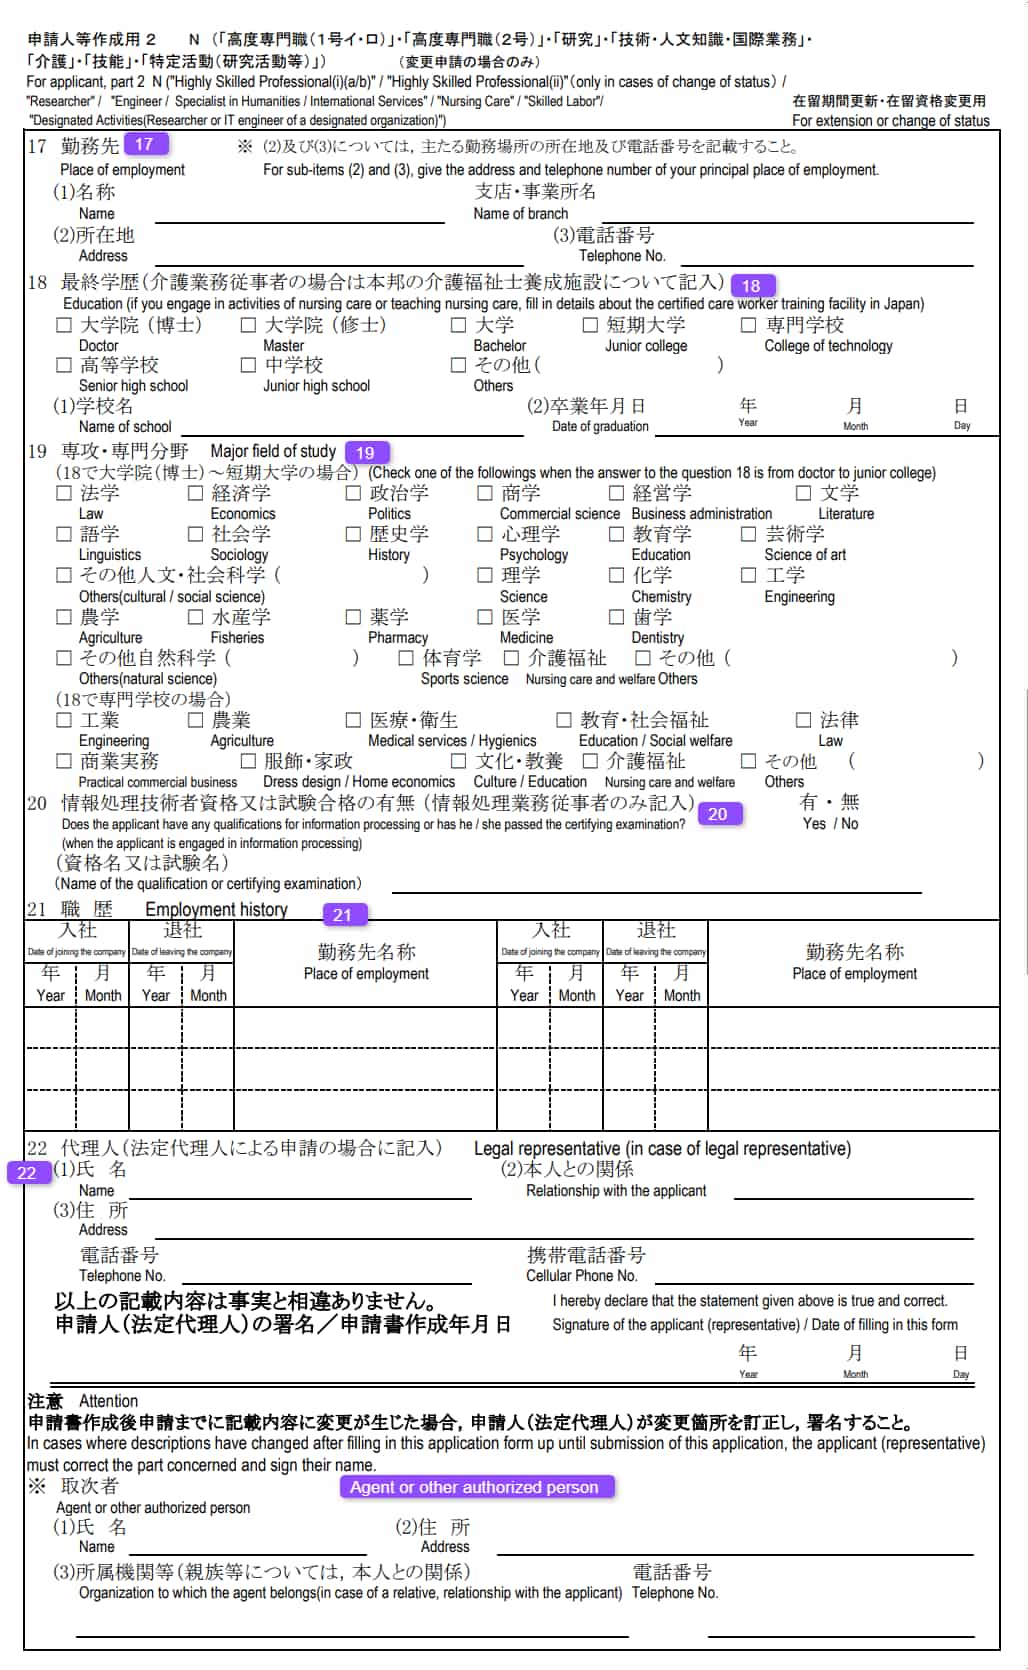
17. 勤務先 (Place of Employment)
Fill in the official name, branch, address, and telephone number of your current workplace in Japan.
If you are dispatched to a branch office or school, write those details clearly.
Example:
(1) Name: ABC Corporation Ltd.
(2) Branch: Shinjuku Head Office
(3) Address: 1-2-3 Shinjuku, Tokyo 160-0022
(4) Telephone: 03-1234-5678
18. 学歴 (Education)
In this section, you must write down the highest level of education you have completed. First, check the box that matches your degree or level (Doctor, Master, Bachelor, Junior College, College of Technology, High School, or Junior High School).
After that, write the name of the school or university where you studied, and the exact graduation date (Year / Month / Day). Immigration wants this to confirm your academic background, so make sure it matches your certificates and transcripts.
Example:
✔ Bachelor
(1) Name of School: Kathmandu University
(2) Date of Graduation: 2016 / 07 / 15
19. 専攻・専門分野 (Major Field of Study)
Select your main academic or professional field. Options include Law, Economics,
Politics, Engineering, Education, Nursing Care, and more.
If your field is not listed, check “その他 (Others)” and write it down.
Example: Engineering – Computer Science
20. 情報処理技術資格試験合格の有無 (Information Processing Qualifications)
This section asks if you hold certifications in IT or information processing. If you do, write the exam or certification name. If not, simply select “無 / No.”
21. 職歴 (Employment History)
Provide a list of your past jobs, both in Japan and overseas. Include the company name, the date you joined, the date you left, and the type of work. Write in chronological order starting with the most recent.
| Place of Employment 勤務先名称 |
Date of Joining 入社 (YYYY/MM) |
Date of Leaving 退社 (YYYY/MM) |
|---|---|---|
| XYZ Software Ltd. (Tokyo) | 2020/04 | Present |
| ABC Solutions Pvt. Ltd. (Nepal) | 2017/05 | 2019/12 |
22. 代理人 (Legal Representative)
This section is only filled if a legal representative (such as a parent applying on behalf of a minor) is submitting the form. If you'r applying by yourself then leave this field blank and in the place of signature and date do your signature and write the date when you submit these documents to Immigration. You must include:
- (1) Name of the representative
- (2) Relationship to the applicant (e.g., Father, Mother, Guardian)
- (3) Address of the representative
- (4) Telephone and mobile numbers
Example:
Name: Hiroshi Tanaka
Relationship: Father (Guardian)
Address: 4-5-6 Nerima, Tokyo 176-0001
Telephone: 03-5555-1234 | Mobile: 090-9876-5432
At the bottom of Page 2, the applicant (or representative) must sign and date the form.
- If you are applying yourself, sign your own name and write the date.
- If a representative applies for you, they must sign and add the preparation date (Year / Month / Day).
- If this section does not apply, simply leave it blank.
取次者 (Agent or Authorized Person)
If your application is submitted through an administrative scrivener (Gyoseishoshi lawyer) or another agent, write their name, address, organization, and contact number. If not, leave this part blank.
Page 3: 所属機関等作成用 / Employer & Organization Information
Page 3 must be filled in by your employer, dispatching company, or affiliated organization. If you are applying by yourself, you should ask them for help when completing this page. Make sure together that every field is written correctly and matches the company’s official records, since Immigration uses this page to confirm the company’s contract type, registration, salary, and job details.
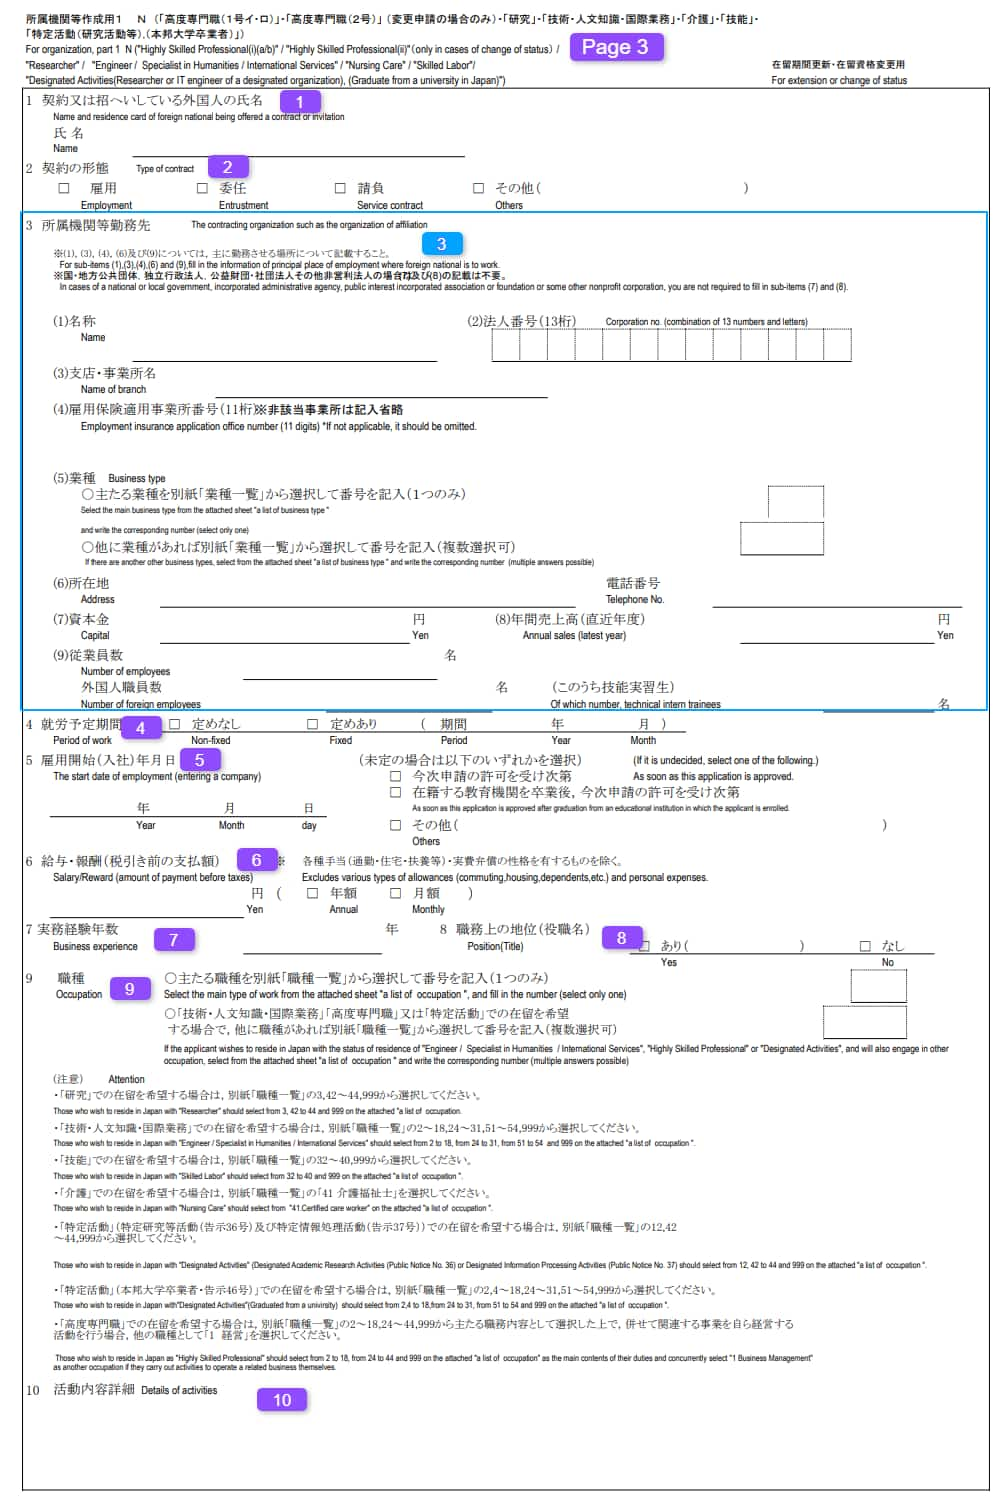
1. 契約又は招へいについて外国人の氏名 (Name of foreign national being offered a contract or invitation)
The employer writes the full legal name of the applicant (you). This must match the name shown on Page 1.
2. 契約の形態 (Type of contract)
Employer selects the contract type that applies:
- 雇用 (Employment)
- 委託 (Entrustment)
- 派遣 (Dispatch / Service contract)
- 請負 (Contract for work)
- その他 (Others) — explain if chosen
3. 所属機関等勤務先 (The contracting organization / place of employment)
Company / organization details to be entered by the employer:
(1) 事業所名 / Name of organization
(2) 法人番号 (13桁) / Corporation number (13 digits)
(3) 支店・事業所名 / Name of branch (if any)
(4) 雇用保険事業所番号 (該当する場合) / Employment insurance office number (11 digits; omit if not applicable)
(5) 業種 / Business type — select the correct code from the attached list of business types.
(6) 所在地 / Address
(7) 電話番号 / Telephone number
(8) 資本金 / Capital (Yen) and 年間売上高 / Annual sales (latest year)
(9) 従業員数 / Number of employees (and number of foreign employees)
4. 労働契約期間 (Period of work / Contract period)
Here the company must state whether your employment has an unlimited period (定めなし)
or a fixed-term contract (定めあり).
- 定めなし (No fixed period): This means you are employed without an end date, usually a permanent or full-time position.
- 定めあり (Fixed period): This means your contract has a set duration. The employer must enter the period separately in the Year and Month boxes on the form.
Examples:
• 1 year → write “1” in the Year box and “0” in the Month box
• 3 years → write “3” in the Year box and “0” in the Month box
• 1 year 4 months → write “1” in the Year box and “4” in the Month box
5. 就労開始予定年月日 (Start date of employment)
Enter the planned start date. If the applicant is already employed, clarify whether work starts as soon as the application is approved. If the applicant is a student, note if employment begins after graduation (include the graduation date).
6. 給与・報酬 (Salary / Reward — amount before taxes)
In this section, the employer must write the applicant’s base salary (before taxes).
First, choose whether the amount is written as annual (年額) or monthly (月額) by checking the correct box.
Important: This field is only for the basic salary. Do not include allowances such as housing, family support, or commuting allowance, even if they are paid regularly.
Example:
If your contract states:
• Base salary: 180,000 yen / month
• Housing allowance: 50,000 yen
• Family allowance: 40,000 yen
• Other allowance: 10,000 yen
Then your total monthly payment is 280,000 yen, but here you must write only 180,000 yen as the base salary.
7. 実務経験年数 (Business Experience)
Write the applicant’s total work experience in years and months.
This section is only about the length of experience.
Example: 5 年
8. 職務内容 (Job Duties / Occupation)
Write a short description of the main work tasks the applicant will do in Japan.
You can use the official categories such as “Engineer,” “Specialist in Humanities,” or “International Services.”
If the job has no specific duties, check the box for なし (None).
If there are several tasks, write the main duty first and then add any secondary ones.
9. 職種 (Occupation Code & Details)
Here you need to write the occupation code and a short description based on Immigration’s official list.
These codes are provided in the attachments of the form:
- 別紙 業種一覧 (Attachment: List of Business Types)
- 別紙 職種一覧 (Attachment: List of Occupations)
Example: 231 — Software Engineer (システム開発・保守)
For a full explanation of how to read these lists, please see the section
“Understanding the Business Type & Occupation Lists.”
10. 活動内容詳細 (Details of activities)
Write a clear, plain-language summary of what the applicant will do day-to-day in Japan. Include typical tasks, scope of responsibility, and the beneficiary of the work (e.g., internal systems, clients). Example: “Develop and maintain banking system back-end modules; perform unit testing and coordinate with product owners for requirements.”
- This page is normally completed and signed/stamped by the employer (HR / manager).
- Immigration may request supporting documents such as company registration, financial statements, pay slips, or a company brochure.
- Ensure dates, amounts, and names match other documents (employment contract, pay records, company certificates).
Understanding the Business Type & Occupation Lists Along with the application form, you may notice two extra pages titled
別紙 業種一覧 (Attachment: A list of Business Type) and
別紙 職種一覧 (Attachment: A list of Occupation).
These are reference sheets only you do not submit them with your application.
Instead, they are used by your employer when filling out Page 3 of the renewal form. 1. 別紙 業種一覧 (Business Type List)
This sheet lists the official industry categories for companies and organizations in Japan. On Page 3, Section 3 (4) 業種 / Business type, your employer must select the correct code from this list and write the number. It describes the type of organization you work for.
Examples:
- 14 – 情報通信業 (Information & Communication) → for IT / web development companies
- 36 – 学校教育 (School Education) → for schools and universities
- 45 – 宗教 (Religion) → for religious institutions
2. 別紙 職種一覧 (Occupation List)
This sheet lists the official occupation categories for workers. On Page 3, Section 7 (職種 / Occupation), your employer must select the correct code for your actual job role and write the number. The first box is for your main job, and the second box is for additional roles if applicable.
Examples:
- 12 – 情報処理・通信技術 (Information Processing / Communications Technology) → for Web Developers, Engineers, IT staff
- 44 – 教育 (University, etc.) → for Professors or University Teachers
- 79 – 宗教家 (Religious Worker) → for missionaries, priests, monks
- You don’t need to submit these attachment pages — they are only for reference.
- Your employer is responsible for choosing and filling the correct numbers.
- If you are in IT (like a Web Developer), your code is usually 12. For the company itself, the industry code would often be 14 (Information & Communication).
- Always double-check that the chosen codes match your contract and job description, because Immigration will compare them with your supporting documents.
Page 4 — Dispatch Site Information
Page 4 is only required if the applicant is being dispatched to another company, branch, or site that is different from the main employer written on Page 3. If you are a regular employee directly hired by your company (and not dispatched), you can leave most of these fields blank. However, the company’s stamp, signature, and date are still required at the bottom of this page.
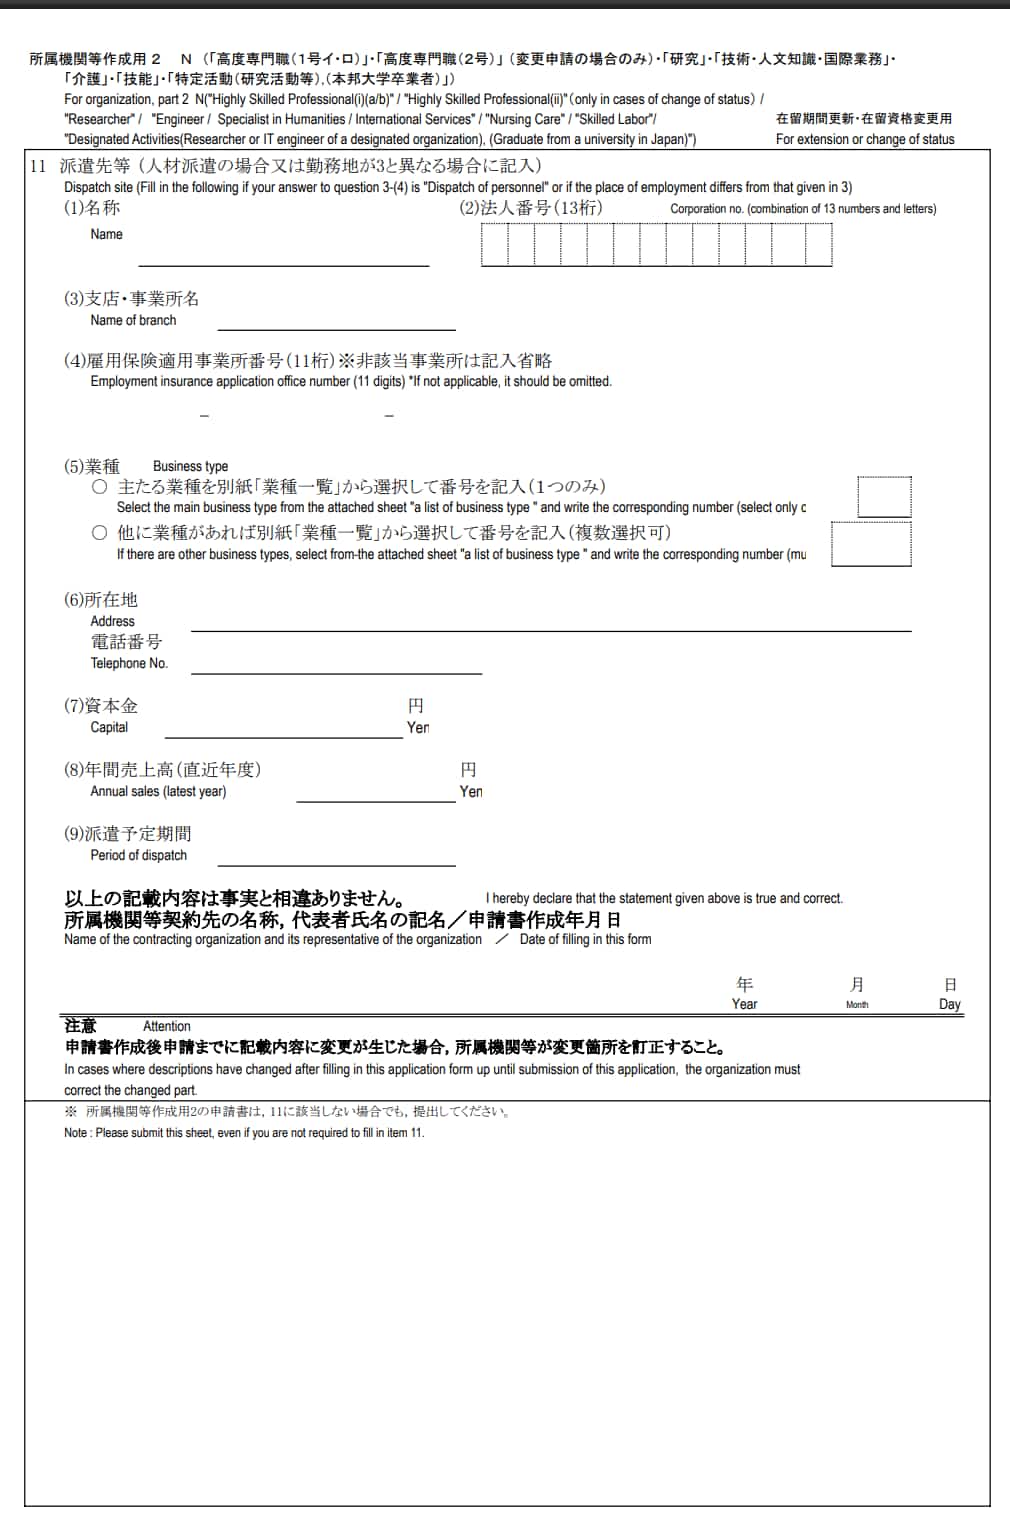
11. 派遣先等 (Dispatch site)
This section collects details of the company, branch, or site where the applicant will actually be working if it is different from the employer’s head office.
For example:
If you are hired by a staffing agency and dispatched to another company.
If your work location is a branch office (not the main office listed on Page 3).
If this does not apply to you, you can leave it blank.
(1) 名称 (Name)
Write the name of the dispatch company, branch, or affiliated organization where the applicant will work.
(2) 法人番号 (Corporation No.)
Write the 13-digit corporate number of the dispatch company or branch (if applicable).
(3) 支店・事業所名 (Name of Branch / Office)
If the applicant will work at a branch or office (not the head office), write the branch name here.
(4) 雇用保険適用事業所番号 (Employment Insurance No.)
The dispatch site’s 11-digit employment insurance office number (if available). If not applicable, leave blank.
(5) 業種 (Business Type)
Write the business type of the dispatch company or site, using the code from the official list of business types (別紙 業種一覧). If multiple types apply, you may select more than one.
(6) 所在地・電話番号 (Address & Telephone)
Write the full address and phone number of the dispatch site.
(7) 資本金 (Capital)
State the company’s capital (in yen). If not available or not required, leave blank.
(8) 年間売上高 (Annual Sales)
Write the dispatch company’s total annual sales for the most recent fiscal year. If not applicable, leave blank.
(9) 派遣予定期間 (Period of Dispatch)
State the planned period of dispatch (Year / Month). If not fixed, leave blank.
署名・押印 (Signature, Stamp, Date)
At the bottom of Page 4, this section must always be completed.
- If you are working directly for the same company (no dispatch organization), write your company’s information here.
- If you are dispatched to another organization, write the dispatch company’s details here.
- Representative’s signature
- Company stamp (印鑑)
- Date of completion
This confirms that the information on Page 4 is correct. Even if most fields are blank (because dispatch does not apply), the company must still stamp, sign, and date this page.
Submission Process
In-Person Submission (Recommended)
For your first or second renewal, going to the Immigration office in person is the most reliable choice especially if you’re not fully confident about your documents. At the Immigration Bureau, there is a document pre-check counter/section (before the final submission desk). Staff will review your forms and attachments and tell you if anything is missing or needs correction.
- Prepare all documents (forms, tax certificates, employer letters, photo, passport, residence card, etc.).
- Go to Immigration and head to the pre-check window first (ask any staff if unsure where it is).
- Show your full set. They will confirm if your application is complete and guide you to the correct submission window.
- Submit your application at the instructed window. No payment is required at this time.
- You will receive a receipt / pick-up slip. Keep it safe you’ll need it when you collect your new residence card.
At the Submission Counter: Fill the Contact Slip Correctly
At final submission, you’ll fill a short contact slip/form with your personal details. Immigration uses this to mail the notification postcard when your new Residence Card is ready. Make sure your address is complete and accurate.
- Write the full address including postal code, prefecture/city/ward, block & building name, and room number.
- Match your current records: use the same address as your latest jūminhyō (住民票).
- Furigana/romaji: if the form asks for kana, add furigana for your name and address; otherwise print clearly in block letters.
- If you moved recently, tell the staff and update your address at the ward/city office to avoid missing the postcard.
- Phone & email (if requested): provide a number/email you actually check.
A simple trick: keep a photo of your mailbox label or a recent utility bill copying from it helps you avoid address mistakes.
Renewal Fee & Payment Method
You do not pay at the time of submission. The renewal fee is paid later, when your new Residence Card (在留カード) is ready.
- Payment is made by purchasing a revenue stamp (収入印紙 / shūnyū inshi) from a convenience store (コンビニ) or Japan Post Bank (ゆうちょ銀行 / JP Bank).
- The notification letter/postcard sent by Immigration will state the exact amount and what to bring on the collection day.
- Attach the stamp as instructed on the day you receive your new card.
After Submission: What Happens Next
- Receipt / Pick-up slip: You will get a small receipt—keep it and bring it when collecting your new card.
- Notification letter/postcard: When your new card is ready, Immigration will send a notice to your address with instructions (what to bring, fee amount, and where to go inside the office).
- Collection day: Bring your passport, current residence card, receipt, and the revenue stamp specified in the notice. Follow the desk instructions to receive your new Residence Card.
Note: If your address changes while waiting, update your residence records promptly to avoid missing the postcard.
Processing Time & Results
For most renewals, the standard processing time is about 2 weeks to 1 month. It can be faster or slower depending on the office and season, so applying early is always smart.
If Your Current Visa Expires While Your Renewal Is Pending
If you filed before the expiry date, you’re covered by a special “grace period” (特例期間 / tokurei kikan). You can stay in Japan and continue the same activities allowed by your current status until Immigration makes a decision or up to two months after your original expiry date whichever comes first.
- You’ll get an application receipt. For in-person filings, Immigration usually prints 「申請中」 (shinsei-chū / “application pending”) on the back of your residence card. Keep it with your passport.
- You may keep working if your current status permits employment (e.g., Engineer/Specialist in Humanities/International Services).
- If you need to travel, check with Immigration first travel while pending can affect procedures.
When a Decision Is Made
- Approved: You’ll receive a postcard/notice with what to bring for pickup. Bring the notice, passport, current residence card, and the fee stamp (covered in the payment section).
- More documents needed: Immigration will tell you exactly what to add. Submit the missing items and your case continues.
- Not approved: You’ll be informed of the result. Speak with your employer/HR or a licensed gyoseishoshi for next steps.
Tips for a Smooth Renewal
A smooth renewal is mostly about timing, consistency, and tidy paperwork. Use these quick, proven tips:
- Apply early (1–2 months before expiry): This gives you room if Immigration asks for extra documents.
- Double check the employer section (Page 3): Confirm the official company name, registered address, corporation number, and the correct Business Type/Occupation codes. Make sure it’s signed/stamped as required and that job title, salary, and contract details match your other papers.
- Keep copies of everything: Bring originals plus paper copies, and save clear PDFs/photos in a folder (passport, residence card, tax certificates, application pages, employer docs). Snap a photo of the submission receipt so you don’t lose the details.
- Make addresses match exactly: Use the same address as your latest jūminhyō (住民票). Include postal code, building name, and room number. Write clearly this is what Immigration uses to mail your pickup notice.
- Check for consistency across documents: Names (romanization/katakana), dates (YYYY/MM/DD), job titles, and salary figures should be identical everywhere (application, contract, certificates).
- Use the correct photo: 4 cm × 3 cm, taken within the last 3 months, plain background, face fully visible. Bring a spare just in case.
- Organize your pack: Put the application pages on top, then supporting documents in the order listed in your checklist. Use clips or a clear file; add small sticky notes to mark key pages.
- Write neatly (black pen/block letters): If any part is handwritten, avoid corrections and unreadable abbreviations.
- Ask for a pre-check at Immigration: Before final submission, show your whole set to the pre-check counter. They’ll confirm completeness and direct you to the correct window.
- Coordinate with HR early: Request company documents and stamping well in advance so Page 3 isn’t delayed.
- Have a fallback plan: If something is missing, ask staff exactly what to bring next time and note the window and instructions.